Dev Log 2 - Map Generation

World Map Concepts
For the World Map I knew that I wanted a map large enough to facilitate exploration, and the players ever expanding village. I also wanted the experience to be different each time, so naturally this lead me to using a noise based randomly generated map. Randomly generating worlds can lead to a common pitfall where you end up with a bland or ugly world. I want to ensure my map and game look as good as possible using the pixel art I created, while keeping gameplay interesting and eventful at every corner.
Perlin Noise
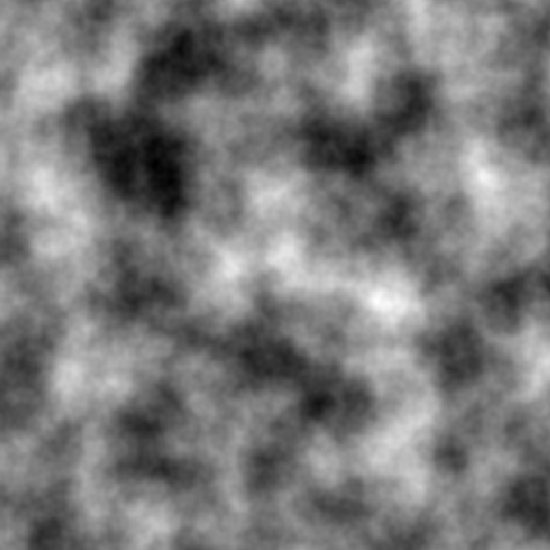
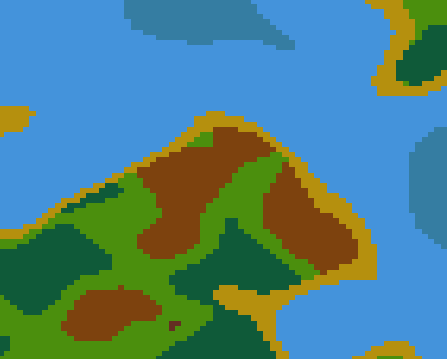
This image of Perlin noise is the key to many randomly generated features in games, fire effects, water effects, and most important to me, map generation. If we take the noise above and read each pixel like a grid from 0,0 to 100,100 for example, each pixel will have a different color from white to black, this value is stored as a decimal float (e.g. 0.34, 0.56). We can then manipulate these values to create terrain 'biomes' that appear at certain values. In fact, I've used 2 layered noises, one that represents the height of the terrain (from deep water, to high mountains), and one that represents the biome (grass, forest, dirt at the moment). So if we take these concepts and turn them into simple pixel colours representing the terrain type we can produce a map like so:
Tilemaps, Terrains & Bitmasking
In order to turn this into a playable game map, while also keeping in mind I want the game to look good, I couldn't simply just generate tiles in each spot like the colours above, or we would end up with a game looking like Minecraft, with harsh ends between terrains, and clear biome edges. Instead I wanted to keep the flowing terrain with corners and edges to produce a beautiful world!
 vs
vs 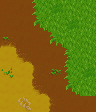
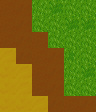
In order to achieve this we need to use Autotiling or Bitmasking. In the simplest terms possible, this means when the generation decides on which tile to select:
It will select which tile to use based on its neighbour tiles (whether they are the same tile - a match, or not). We do this by setting a numerical value to each neighbour tile, and calculating the total value based on which neighbour tiles are connecting or not.
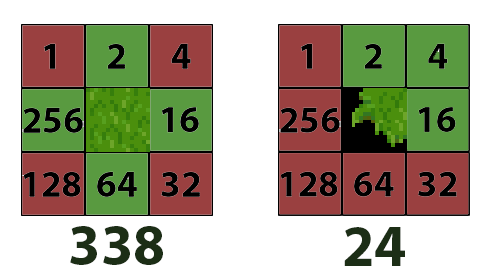
Left: The tile has matching grass neighbours to North, East, South and West, a value of 338 therefore this matches to a main grass piece.
Right: The tile has matching grass neighbours to North, North East, and East, a value of 24 therefore this matches to a corner bottom-right piece.
If your more interested in the specifics you can read about Bitmasking this is a great resource: https://code.tutsplus.com/how-to-use-tile-bitmasking-to-auto-tile-your-level-layouts--cms-25673t.
Godot comes with a few options to handle this, without having to think about all the complexity I've talked about above, but I've explained it for a reason as the Godot features unfortunately weren't suited to my task. I did spend time testing them though, I've concluded that these are more aimed towards small levels, or if you were pre drawing your levels in the editor. These are powerful tools that shouldn't be overlooked just because they weren't right for me. Godot Terrains allow you to quickly setup the bitmasking visually like so:
And then simply start painting your tiles, and they will automatically join up!
This is an incredibly powerful tool and can be done via code also. This is what I first attempted to create my map, and it worked on the surface, until I realised my entire game was freezing during the map generation process. Any map size above 500x500 would freeze the game entirely, potentially making the game look like it had crashed entirely until calculations were complete. This is due to the code running on the main thread, hanging our game until the process is complete. Unfortunately anything in Godot that is touching the Scene Tree (e.g. instantiating objects, adjusting nodes, or in our case creating a tilemap with .SetTile()) needs to be done on the main thread. A quick shoutout to BetterTerrain https://github.com/Portponky/better-terrain plugin which was also very useful and even more powerful than Godot's built in Terrain systems. It does have a way to generate terrain on a thread, and was my next attempt. But as I came to develop the chunking system I will talk about below, it wasn't going to work as each chunk would not be aware of neighbours that fell outside the chunk and into a neighbouring chunk.
So.. after many failed attempts I finally decided to create my own plugin to handle it exactly as I wanted.
My Autotiler Plugin
https://github.com/pepsipwns/ThreadedAutotiler
The great thing about Godot is it is *fairly* straight forward to create your own plugin to create handy tools directly in the editor. Inspired by the BetterTerrain plugin I aimed to do exactly that, using the Bitmasking logic explained before.
Firstly the GUI I created for plugin, aimed to be easy for me create terrains, add tiles, alternative tiles (for more variation), and decorative tiles, like shadow tiles.
From my earlier research I found that common bitmask patterns cover most tiles I need, so in my plugin I created a nice GUI to attach tiles to those bitmasks. You can also add more custom bitmasks if you need a more specific tile (by clicking the +).
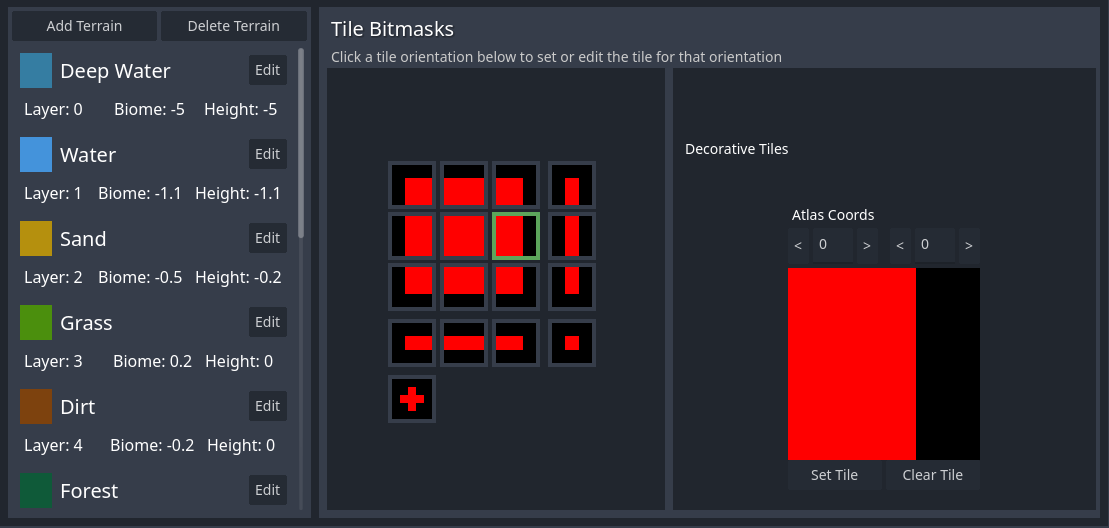
Once setup they would look something like this:
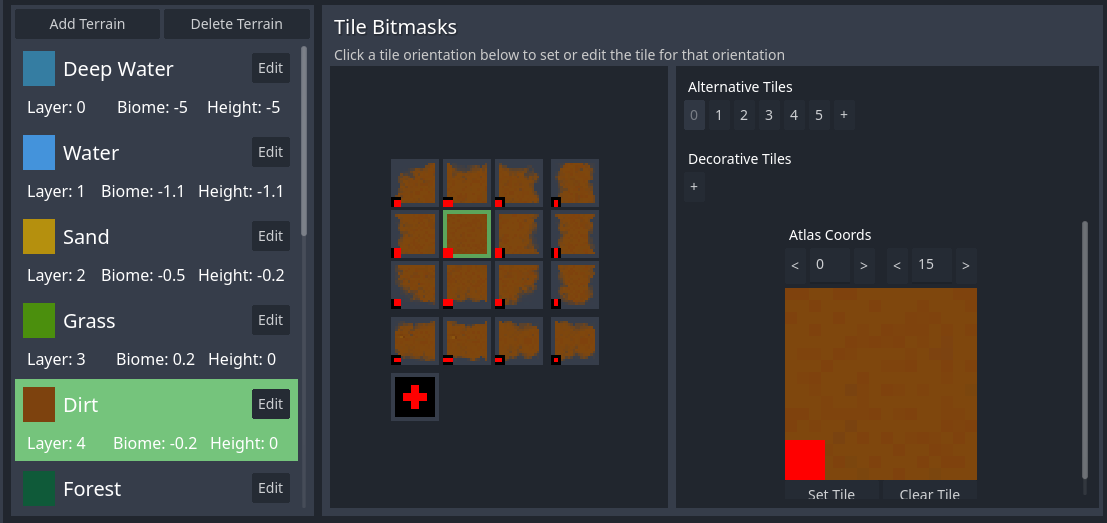
Behind the scenes, each of these bitmask values match up to a numerical value as explained above. Using the Plugin GUI we are basically setting which dirt tile matches to which numerical value when we come to run the calculations. Each terrain type is set up with a layer, a biome and a height value.
Something to note about tilesets:
Each tile in a tileset has a coordinate, this is known as the Atlas coordinate

A quick explanation of what the code is doing:
- Using the noise generation explained above firstly we create a grid of booleans (true or false) for each terrain layer, looping over each tile and deciding whether the terrain passes the noise value at this position. If it does we set the position to true.
- Using the grids from step 1, we then create a grid of bitmask values, going tile by tile, we check each tiles neighbours and add up the values as explained in the bitmask section above. We now have a grid of integer values for each layer.
- Using the grids from step 2, we then create a grid of Vector2(x, y) atlas coordinates, using what we've set up in the plugin GUI it converts the bitmask values into their tile atlas coordinates. This is the final set of grids that is used to draw the Tilemap.
Now this is the extent of the plugin, and we could use this to generate maps extremely quickly on a seperate thread, as all three steps are thread safe and don't touch Godots scene tree whatsoever.
For my game, where I have a fairly large map, I have optimized this even further, by splitting up the grid of Atlas Coordinates in to smaller chunks, so that we can load only what's necessary & visible by the player, increasing performance dramatically.
Chunking
Most open world games will involve some degree of chunking or occlusion culling. This is when we split up the game map into bitesize chunks, and load only the chunks viewable by the games camera. This allows the excess game objects/tiles to be unloaded when not being used, saving memory and increasing performance.
Infinite World or Finite?
As I realised my plugin calculation was extremely quick on a separate thread, I thought I had the possibility to create an infinite world with infinite chunks, much like the world of Minecraft.
So I experimented in a separate project with my plugin, (using only sand and water terrains) automatically generating new chunks every time the camera moved. Here is with the camera zoomed out so you can see whats happening...

(Gif too large to upload to itch.io)
This was a cool idea, but I realised how much complexity it would add to my game, needing to base every random event, resource, mob spawn, etc based only on the perlin noise map, could lead to an uncontrollable and potentially too random world. Something I want to stay away from is a dull randomly generated world, that feels familiar as you explore.
Another major issue with the infinite world, is the navigation of our villagers. Its simple when your game is controlling one main character, as you load the navigation around the player as they move, similar to the chunking system, so they will always be able to move.
However, with my villagers, they all need to be able to move, even when not visible on the screen, still performing their tasks for you while you look around elsewhere. Although this adds major complication, while investigating, I made a pretty cool system that loads chunks of navigation mesh around each villager as they move. (Imagine the visible chunks are all the game camera sees, while the villagers are moving off screen)
Although this seemed effective 90% of the time, there are cases where loading only so many navigation chunks around the villager would still not be enough (over large sea, over mountains, or other unwalkable terrain) they wouldn't be able to find a path. And adding too many navigation chunks started to cause lag. I decided this wasn't going to be scalable for my game which would require large amount of units moving at once.
So my final version...
From a players perspective... (as I've made the UI also!), the 'New Game' screen, allows you to randomly generate a world map, then select your game map within it. This is all done with just the Noise generation system, the game map segment is literally just a segment of the noise.
But when we turn this into an actual playable game map we scale the noise up for a smoother result, as shown below. (In game map & mini map not final)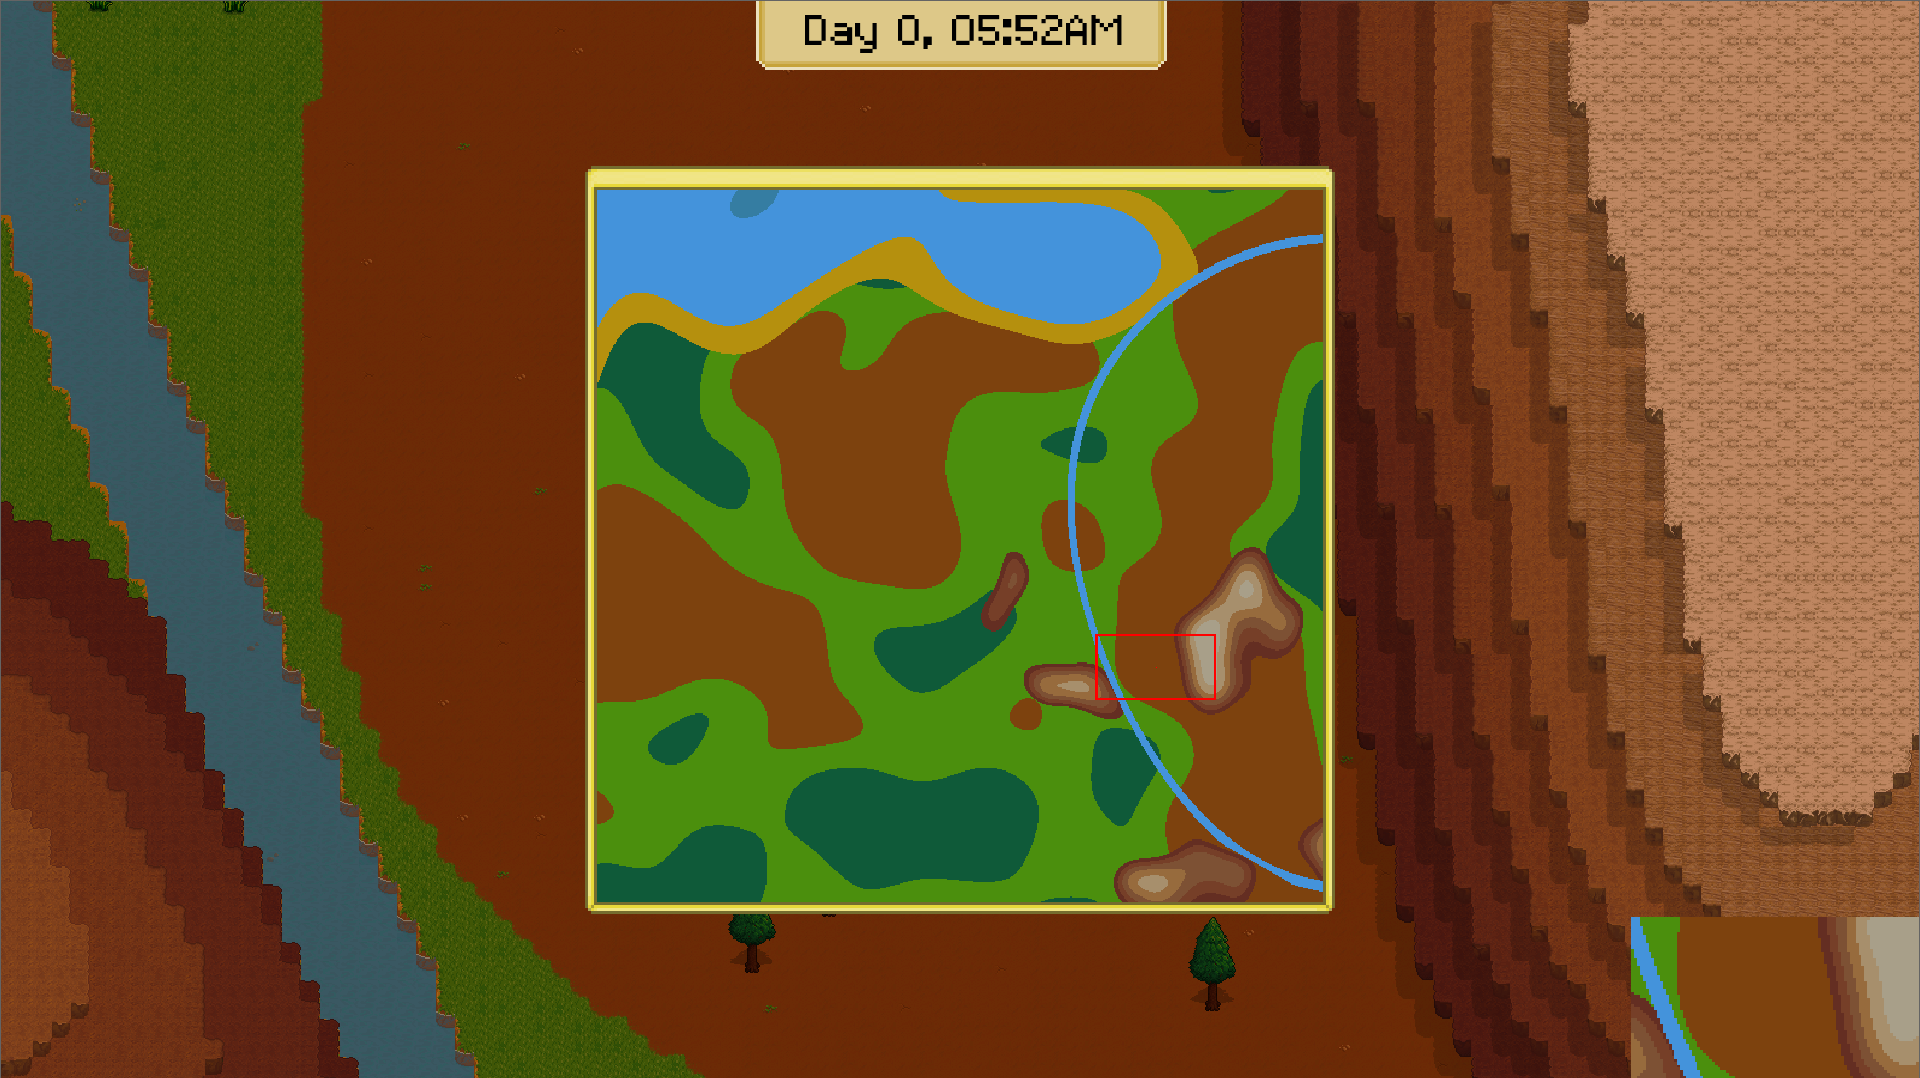
I generate the game map with the plugin, take the grid of Atlas Coordinates it produces, and cut them into chunks. This is all done on a seperate thread so never hangs the game, and allows me to display an updating loading screen.
Then when we actually get into the game to view the tiles, we take the chunks of AtlasCoordinates that are viewable by the camera, and spawn chunks, then .SetTile() the Atlas Coordinates to tiles on the main thread. This happens pretty much instantly so there is no freezing of the game.
Whats happening:

(Gif too large to upload to itch.io)
What the player sees:

(Gif too large to upload to itch.io)
The reason I've gone for an entirely preloaded map of a static size, is to keep focus on gameplay, and filling the landscape with things to do. Still we have the completely randomly generated world map and game map, so I believe I've accomplished an interesting yet unique game map every playthrough. Of course it will get even more interesting as we add gameplay features! And most importantly it was the best method for keeping the navigation system reliable, especially when the villagers wouldn't be visible on the screen. That comes to my final point of discussion today.
Navigation
In unity I had to fully write my own grid & Astar pathfinding algorithm to get even a semi-working pathfinding system. In Godot its all built into the engine! Originally when I was using the in built Godot Terrains, you can bake navigation directly onto the tiles, decide which one is walkable or not, if its water for example, and the engine would take care of it for you. Again I found this was powerful for small maps, but something like my world it was extremely poor performance. The pathfinding algorithm calculates for each tile and surrounding tiles for the best route. As it made a single polygon of navigation for each tile on the map, meaning that when the villager would try to move to a far away point, the pathfinding calculation was massive, freezing the game yet again. Example of Tilemap navigation below:
As I briefly showed earlier, I toyed with navigation in the 'infinite chunking world' version. Something like the features I made there could be used even on my finite world, to split the navigation path into smaller chunks that are calculated as the villager reaches the edge of its movement chunk.
However I found out a better solution with my finite world with a specific world size (e.g. 700x700, 1000x1000) I could pre-bake the navigation using the same Perlin Noise I've generated for the map. Using the height values to decide whether the terrain is walkable or not (water and mountains are not walkable, anything else is).

The code creates Navigation Polygons and joins them all together so it creates something like this, significantly shortening the potential pathlines and removing lag.
Conclusion & Next Time
I am very happy with what I've learned throughout the Map Generation process, and I believe I have come to a ideal solution for my game and learned a few techniques I could use for other styles of games! This has been a long one so hope anyone reading found some use from any of this, nonetheless its great to reflect on my learning and log it somewhere. As you may have noticed in some of the GIFs I have moved on to Resources & Task system. That will be the topic for next Dev Log! Sneak peak: 
Leave a comment
Log in with itch.io to leave a comment.